How to launch a new website: the complete pre-launch checklist
What’s in this article
- Key takeaways
- How should you use this website go-live checklist?
- Who should run through this checklist?
- What are the five launch mistakes that cause the most damage?
- What does the website design checklist cover?
- What should the website testing checklist for functionality include?
- What does the SEO checklist include?
- What performance checks should you run?
- What security items belong on the pre-launch checklist?
- How do you run stakeholder review and sign-off before launch?
- What can wait until after launch, and what cannot?
- What does a typical website launch timeline look like?
- What should you do on go-live day?
- What should you do if something goes wrong after launch?
- What goes on the post-launch checklist?
- FAQ
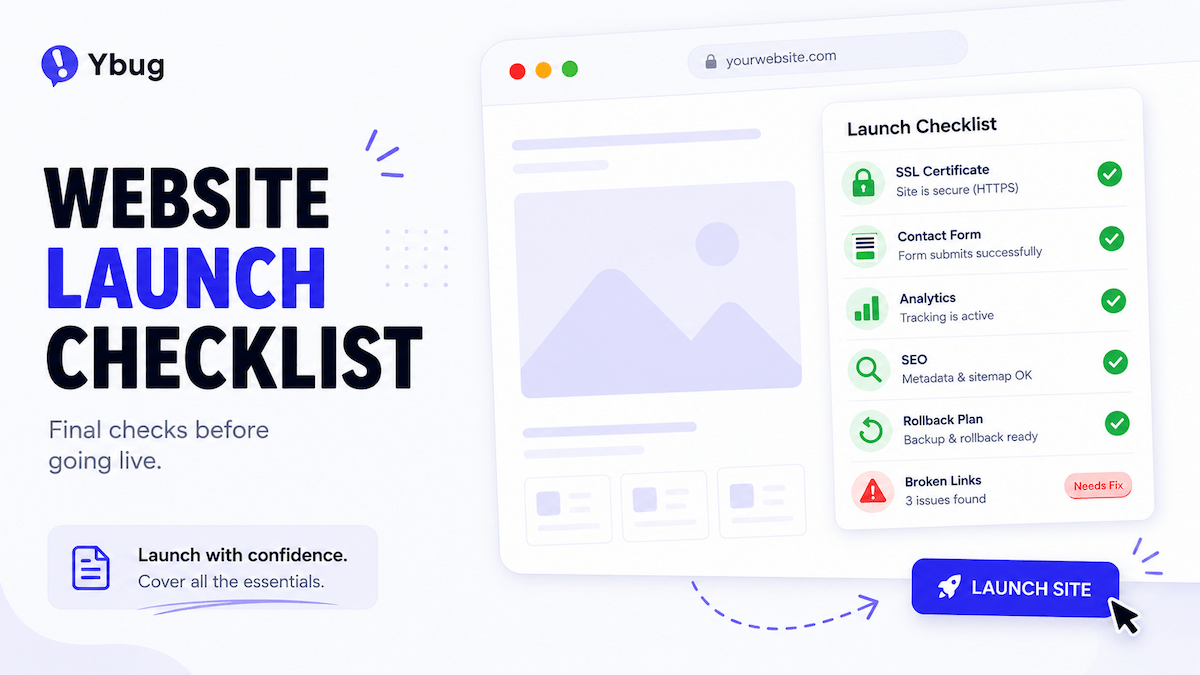
A website launch checklist is a structured list of everything your team needs to verify — design, content, SEO, performance, security, and stakeholder sign-off — before changing DNS and going live. It is the single document that prevents the most common post-launch problems: broken forms, missing redirects, pages still set to noindex, and staging links sent to real users.
Launching a website without a structured checklist is like running a dress rehearsal without a script. Whether you are learning how to launch a website for the first time or running your fiftieth go-live, this guide covers every website design process step from pre-launch testing to post-launch monitoring.
Key takeaways
- Not all checklist items are equal. A forgotten noindex tag or an untested form can cause far more damage than a missing favicon.
- Run the technical checklist — SEO, performance, and security — in parallel with stakeholder review because the two tracks do not block each other.
- Get written sign-off from the client decision-maker before go-live. Verbal confirmation does not prevent post-launch disputes.
- Some items can wait until after launch, while forms, redirects, SSL, analytics, and a rollback plan cannot.
- Keep a feedback channel active for 48–72 hours after launch so issues arrive with useful technical context instead of through scattered emails.
How should you use this website go-live checklist?
This website checklist template is organized into pre-launch and post-launch sections. Run through every section before you change DNS. Do not skip sections because the deadline is close — compressed QA before launch is the fastest route to a post-launch fire drill.
For projects with multiple stakeholders, run the technical sections in parallel with stakeholder review. The two tracks do not block each other, and this approach saves time without reducing coverage.
Who should run through this checklist?
In agency and freelance projects, the checklist should be run by the developer or project manager, not the client. For in-house teams following a structured web design workflow, the project manager or tech lead should own it.
Assign each section to the right owner: developers handle performance and security, content editors review copy and accessibility, SEO specialists validate search requirements, and the project manager manages sign-off. A checklist without a named owner is a checklist nobody checks.
What are the five launch mistakes that cause the most damage?
Not every checklist item carries the same weight. These five mistakes cause disproportionate damage compared with everything else on the list.
1. Noindex tags left active from staging
A redesigned website can begin disappearing from search results when noindex directives are carried over from the staging environment. It can take weeks to diagnose the issue and additional time for rankings to recover. This single checkbox is the highest-stakes item on any website launch checklist.
2. Forms not tested end-to-end on the live environment
A payment gateway may work perfectly in staging but fail in production because live API credentials were never activated. For lead-generation sites, an untested contact form means every visitor who tries to get in touch receives no confirmation, sends no email, and creates no lead in the CRM.
3. Missing 301 redirects from old URLs
Every URL on the previous site that has backlinks, rankings, or bookmarked traffic needs a 301 redirect to its equivalent on the new site. Without redirects, you lose the SEO equity those pages built over months or years, and visitors following old links land on a 404 page.
4. Analytics not configured before launch
If Google Analytics or your tracking tool is not firing from minute one, that data cannot be recovered later. You will not know how many people visited, where they came from, or what they did. For e-commerce sites, this also means missing revenue attribution during a high-traffic launch window.
5. No rollback plan
DNS is changed, the new site is live, and something critical is broken. Without a documented rollback procedure — saved DNS settings, old hosting still active, and a short TTL set in advance — the team has to improvise while users experience the broken site. A 30-minute revert plan is inexpensive insurance.
What does the website design checklist cover?
Visual consistency
- ☐ All pages render correctly in Chrome, Firefox, Safari, and Edge.
- ☐ All pages render correctly on desktop, tablet, and mobile.
- ☐ No layouts break at edge-case screen widths such as 320px or 1440px and above.
- ☐ Typography is consistent across font sizes, weights, and line heights.
- ☐ The color palette is consistent, with no leftover colors from an old brand or template.
- ☐ Images are high quality, correctly sized, and not stretched or distorted.
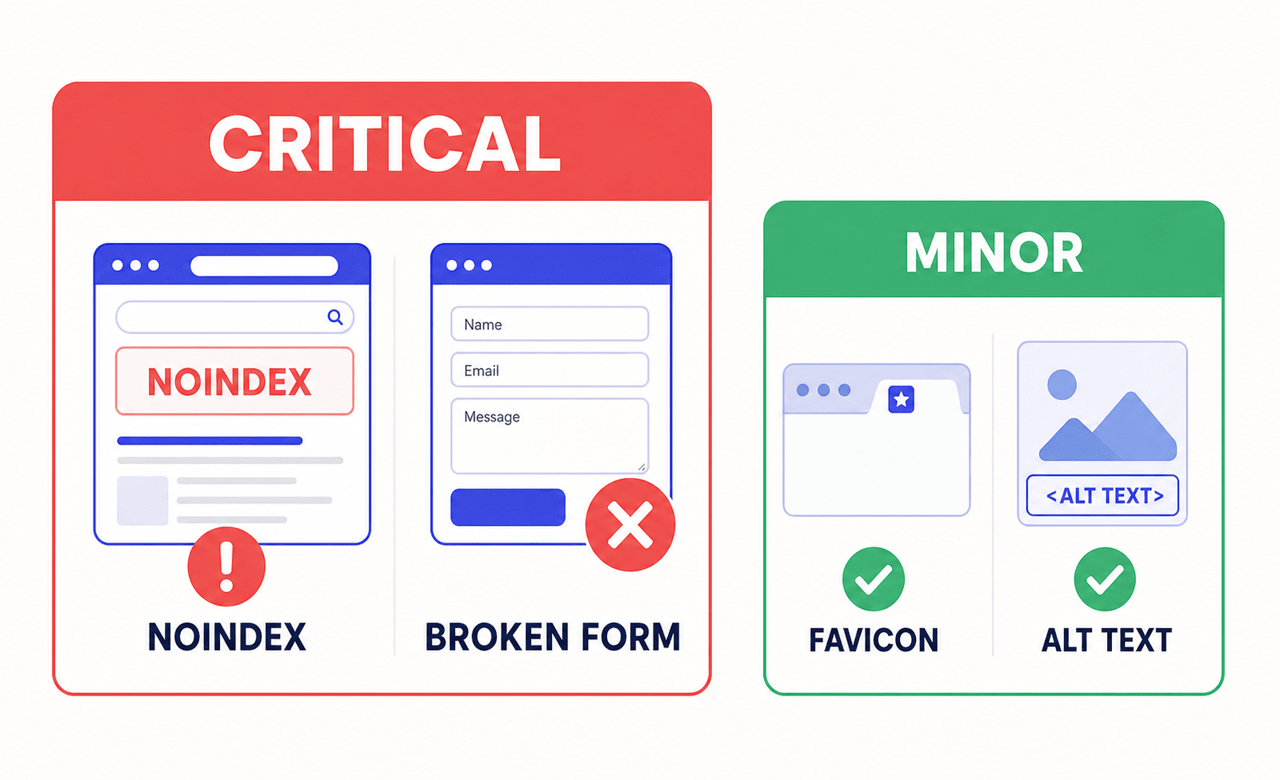
- ☐ The favicon displays correctly in browser tabs.
- ☐ No placeholder images, dummy text, or template content remains.
Content accuracy
- ☐ Every page has been proofread for typos, grammar errors, and inconsistencies.
- ☐ Contact details, dates, prices, and product information are current.
- ☐ Privacy Policy, Terms of Service, and Cookie Policy pages are complete.
- ☐ The copyright year in the footer is current.
- ☐ Internal links point to the correct pages, not staging, old domains, or 404s.
- ☐ External links open correctly and in new tabs where appropriate.
- ☐ Images have descriptive alt text for accessibility and SEO.
- ☐ The cookie consent banner is present and functional where required.
What should the website testing checklist for functionality include?
Forms are among the most common post-launch issues, and among the most damaging, because failed submissions mean lost leads.
- ☐ Every form has been tested end-to-end, including delivery to the correct email address or CRM.
- ☐ Confirmation messages and thank-you page redirects work after submission.
- ☐ Transactional emails are delivered and do not land in spam.
- ☐ E-commerce carts, checkout, and payments have been tested with live credentials.
- ☐ Navigation menus work on desktop and mobile, including dropdowns and close buttons.
- ☐ Calls to action, buttons, links, and banners point to the correct destinations.
- ☐ Search works if the site includes it.
- ☐ Maps, calendars, chatbots, booking widgets, and other third-party embeds load correctly.
- ☐ The 404 page is helpful and includes a route back into the site.
- ☐ Keyboard navigation, screen-reader behavior, and color contrast have been checked.
What does the SEO checklist include?
SEO issues discovered after launch are significantly harder to fix than pre-launch issues. Google Search Central documentation explains how noindex directives prevent search engines from indexing a page.
- ☐ Critical: remove noindex directives inherited from staging.
- ☐ Every page has a unique, optimized meta title and meta description.
- ☐ Every page has one clear H1 and a logical heading hierarchy.
- ☐ The XML sitemap is generated and submitted to Google Search Console.
- ☐ robots.txt does not accidentally block important pages.
- ☐ Canonical tags are present for duplicate or near-duplicate content.
- ☐ URLs are clean, descriptive, and use hyphens instead of underscores.
- ☐ 301 redirects cover every changed or deleted URL from the previous site.
- ☐ Analytics, conversion goals, and events are configured and verified.
- ☐ Google Search Console ownership is verified.
- ☐ Open Graph and social-sharing metadata is present.
For redesigns, create a complete URL mapping document and test every redirect before DNS cutover. A missing redirect on a high-traffic page can erase months of accumulated search value.
What performance checks should you run?
Page speed affects both user experience and search performance. For current measurements and thresholds, refer to Google Core Web Vitals documentation. For a practical optimization guide, see how to increase website speed.
- ☐ Images are compressed, correctly sized, and served in modern formats where supported.
- ☐ CSS and JavaScript files are minified for production.
- ☐ Browser caching is configured.
- ☐ A CDN is in place when the audience is geographically distributed.
- ☐ Google PageSpeed Insights has been reviewed and critical issues addressed.
- ☐ LCP, INP, and CLS meet acceptable Core Web Vitals thresholds.
- ☐ Render-blocking resources do not delay essential above-the-fold content.
What security items belong on the pre-launch checklist?
- ☐ An SSL certificate is installed and HTTPS is enforced across the site.
- ☐ HTTP URLs redirect to HTTPS automatically.
- ☐ Mixed-content warnings are resolved.
- ☐ The CMS, plugins, and dependencies use current supported versions.
- ☐ Default administrator credentials have been changed.
- ☐ Brute-force protection is active on login pages.
- ☐ Automated backups are scheduled and stored off-site.
- ☐ The staging URL is secured or deactivated after launch.
- ☐ Cookie consent and data processing follow applicable privacy requirements.
How do you run stakeholder review and sign-off before launch?
Before launch, every key stakeholder needs to review the site on staging and formally confirm that it is ready. Stakeholder review often goes sideways because of the process rather than the site itself.
Common stakeholder review mistakes
Too many reviewers without clear roles. When five people review the same page, you get five different opinions, and some will contradict each other. Assign each reviewer a specific focus such as content accuracy, brand consistency, legal compliance, or technical functionality.
No single decision-maker. “We all need to agree” means nobody has authority to approve. Identify one person whose sign-off is final before the review begins.
Feedback arrives after sign-off. Confirm the stakeholder list upfront and give everyone the same review window so a late reviewer cannot reopen the project unexpectedly.
Conflicting feedback has no resolution process. A clear content approval workflow with a named decision-maker at each stage prevents the designer or developer from being trapped between opposing requests.
How to run the staging review efficiently
Install a visual feedback tool on the staging environment before sharing it with reviewers. Clients and stakeholders can start feedback directly on the page and annotate the captured screenshot, while browser, operating system, URL, and console context is captured automatically. Each issue can then route to the project management tool as a structured ticket.

For projects following a user acceptance testing process, the staging review is where formal UAT sign-off happens. Document what was tested, who reviewed it, and what was consciously deferred.
The launch checklist protects everyone — the client, the developer, and the project manager. But the most important item on the list is not technical. It is getting written confirmation from the decision-maker that they have reviewed the site and are ready to go live. That conversation prevents many post-launch disputes.
The sign-off document should include the final staging-review date, the reviewers and their roles, confirmation that critical issues are resolved, a list of known deferred issues, and written approval from the client decision-maker.
Set up Ybug on staging so reviewers can report precise, contextual feedback without long email threads.
(no credit card needed)
What can wait until after launch, and what cannot?
No team launches with 100% of every possible improvement complete. The difference between a smooth launch and a messy one is knowing which items are deferrable and which are not.
| Cannot wait — fix before launch | Can wait — schedule after launch |
|---|---|
| Forms and payment flows tested on live | Blog images not yet optimized |
| 301 redirects for changed URLs | Open Graph image fine-tuning |
| Noindex directives removed | Minor layout shifts on low-traffic pages |
| SSL active and HTTPS enforced | Secondary social preview cards |
| Analytics installed and tracking | Non-critical content updates |
| Rollback plan documented | Optimization beyond acceptable performance thresholds |
| Cookie consent functional | Advanced schema for secondary pages |
If an item is in the left column and is not done, delay the launch. If it is in the right column, record it, schedule it, and continue.
What does a typical website launch timeline look like?
| When | What to do |
|---|---|
| 1 week before | Freeze content, finalize redirect mapping, begin stakeholder review, and test integrations on staging. |
| 2–3 days before | Collect stakeholder sign-off, run the final QA pass, and document deferred issues. |
| 1 day before | Back up the current site, reduce DNS TTL where appropriate, confirm rollback, and activate live credentials. |
| Launch day | Switch DNS, test in a clean browser session, verify forms and analytics, and notify the team. |
| First 72 hours | Monitor forms, crawl errors, indexed pages, Core Web Vitals, 404s, uptime, and incoming feedback. |
What should you do on go-live day?
DNS cutover is the most stressful moment in a new website launch, but it does not have to be. Here is how to launch a website successfully.
Choose a quiet launch window. Avoid launching immediately before a major campaign or public holiday. Tuesday through Thursday mornings often give the team more time to observe and respond than a Friday afternoon.
Prepare a rollback plan. Before changing DNS, record the current settings and hosting configuration. The team should know exactly how to restore the previous site if a critical problem appears.
Set a short TTL before cutover. If appropriate for your DNS setup, reduce the TTL to 300–600 seconds far enough in advance for the previous value to expire. Cloudflare DNS documentation explains how TTL controls how long resolvers cache a record.
Test the live URL immediately. Open the site in a fresh private browser session and verify that the correct site loads, HTTPS is active, forms submit successfully, and analytics receives live traffic.
What should you do if something goes wrong after launch?
Even with a thorough checklist, issues can surface after launch.
Keep a feedback channel active. Installing Ybug on the live site during the first 48–72 hours lets anyone report issues with a screenshot and technical context. Reports can route to your QA testing queue automatically.
Triage by severity. Fix critical issues that block key actions immediately. Address major usability problems within 24–48 hours. Record cosmetic issues for the next maintenance window.
Communicate status clearly. For agencies managing customer feedback after launch, structured reports are easier to prioritize than incoming emails from multiple directions.
What goes on the post-launch checklist?
Launching a website is not the finish line. It is the start of the monitoring phase.
Immediate checks within one hour
- ☐ The live URL loads the new site rather than a cached old version.
- ☐ HTTPS is active on the live domain.
- ☐ Forms and payment flows have been tested on live, not only on staging.
- ☐ Analytics receives data from the live domain.
- ☐ Google Search Console is configured for the live domain.
- ☐ The old staging URL is inaccessible or redirects appropriately.
Metrics to monitor during the first 72 hours
- ☐ Form submissions arrive correctly and match expected volume.
- ☐ Search Console shows no unexpected crawl errors or server errors.
- ☐ The indexed-page count aligns with the intended number of public pages.
- ☐ Core Web Vitals remain acceptable with real-user traffic.
- ☐ Server logs and Search Console show no spike in 404 errors.
- ☐ Uptime monitoring is active.
- ☐ Social previews render correctly and social profiles use the new URL.
For agencies and freelancers, keeping Ybug active after launch collects issues with full technical context and routes them directly through integrations with tools such as Jira, Trello, and GitHub.
Keep launch feedback organized with annotated screenshots and automatic technical details in every report.
(no credit card needed)
