How to annotate a website: tools, methods and best practices
What’s in this article
- Key takeaways
- What is website annotation?
- Why do email and screenshots fall short?
- What are the main methods to annotate a website?
- How to annotate a website with a feedback widget (step by step)
- How to annotate images and screenshots
- Who benefits most from website annotation?
- Website annotation best practices
- How do you choose the right website annotation tool?
- FAQ
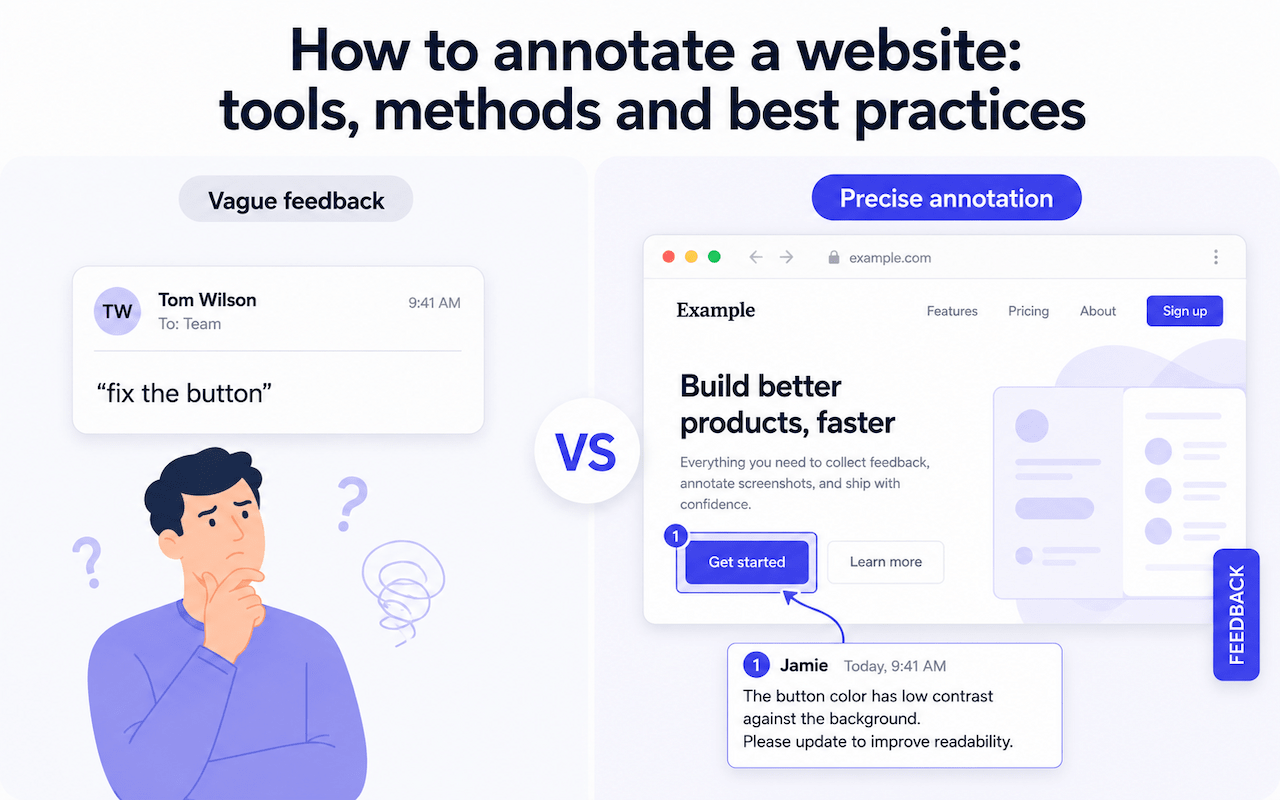
Website annotation is the process of adding comments, highlights, and visual markers directly on a live webpage - so feedback stays connected to the exact element being discussed, rather than floating in an email or Slack message that nobody can trace back to anything specific.
When a developer receives a comment saying “fix the button,” they spend 10 minutes trying to figure out which button. When they receive an annotated screenshot pinning the comment directly to the element - with browser, URL, and page state captured - they open the ticket and fix it. That is the difference website annotation makes.
Key takeaways
- Website annotation ties feedback directly to the element being discussed - eliminating vague comments like “fix the button.”
- The most efficient method for web teams is a visual feedback widget: one click, annotated screenshot, automatic technical context, ticket in your PM tool.
- Annotate on staging, not production - annotation workflows belong where review is expected and acted upon.
- For design-phase feedback, image annotation tools such as Figma and Snagit work well; for live pages, direct page annotation is always more accurate.
- A single feedback channel beats five parallel ones - email, Slack, and widget submissions mixed together create triage chaos.
What is website annotation?
Website annotation is the practice of leaving contextual feedback directly on a live web page - without editing any HTML or CSS. Annotations can take the form of pinned comments, drawn arrows, highlighted text, or screenshot markups. They are visible to other team members using the same tool, making feedback collaborative and traceable.
The key word is contextual. An annotation lives on the page, next to the element it refers to. When the page changes, the feedback is still tied to the right area. When a developer opens the ticket, they see exactly what was flagged - not a description they have to interpret.
Website annotation is commonly used during:
- Client review: clients flag issues on a staging site before go-live.
- QA testing: testers document bugs directly on the page they are testing.
- Design feedback: designers and developers align on visual changes on a live URL.
- UAT: stakeholders validate a build against requirements before sign-off.
- Content review: editors flag copy or layout issues on draft pages.
Why do email and screenshots fall short?
Most teams default to email, Slack messages, or static screenshots when collecting website feedback. It works - until it does not. Here is where it consistently breaks down:
Vague references. “The button looks off” or “the top section needs work” are descriptions that require follow-up questions before anyone can act on them. Different people have different mental models of what “the top section” means.
Missing context. A screenshot captures what was visible at one moment on one screen. It does not capture what happened just before, what the browser was, what size the viewport was, or what errors appeared in the console. Developers often need that context to reproduce the issue.
Version confusion. Screenshots get outdated the moment the page changes. If a fix was already applied and someone’s screenshot is from before that change, the team wastes time reviewing something that no longer exists.
Scattered feedback. When five people each email their notes separately, consolidating all of it into actionable tickets is manual work - often falling on the project manager or the developer, neither of whom should be doing it.
Annotation tools solve all four problems by putting feedback directly on the live page, capturing context automatically, and routing it to wherever the team already tracks work.
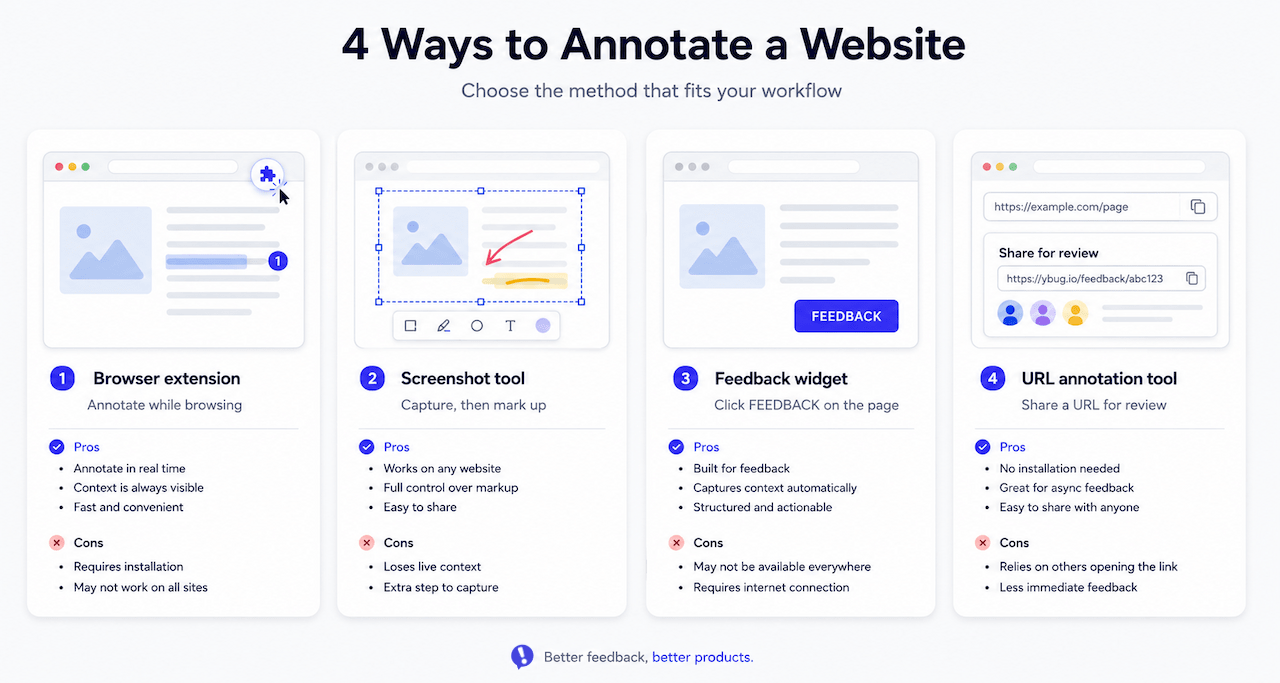
What are the main methods to annotate a website?
Not all annotation methods are equal. The right one depends on who is giving feedback and what happens to it afterward.
| Method | How it works | Best for | Limitation |
|---|---|---|---|
| Browser extension | Install an extension, open any page, add markup. | Quick personal notes or ad-hoc annotation. | Often local only - annotations lost on refresh or browser switch. |
| Screenshot + image editor | Take screenshot, annotate in Photoshop, Figma, or Preview. | Simple design markups. | Disconnected from live page, becomes outdated immediately. |
| Dedicated feedback widget | JavaScript snippet installed on the site - anyone clicks a button to annotate. | Client review, QA testing, UAT, ongoing feedback. | Requires brief setup on the site. |
| URL-based annotation tools | Paste a URL into the tool, get an annotatable canvas. | External review of public URLs. | Less suited for staging environments or sites behind authentication. |
For professional web teams - developers, QA testers, project managers, agencies, and freelancers - the feedback widget approach is almost always the most efficient. It keeps annotations on the real page, captures technical context automatically, and routes reports directly to the team’s existing tools.
How to annotate a website with a feedback widget (step by step)
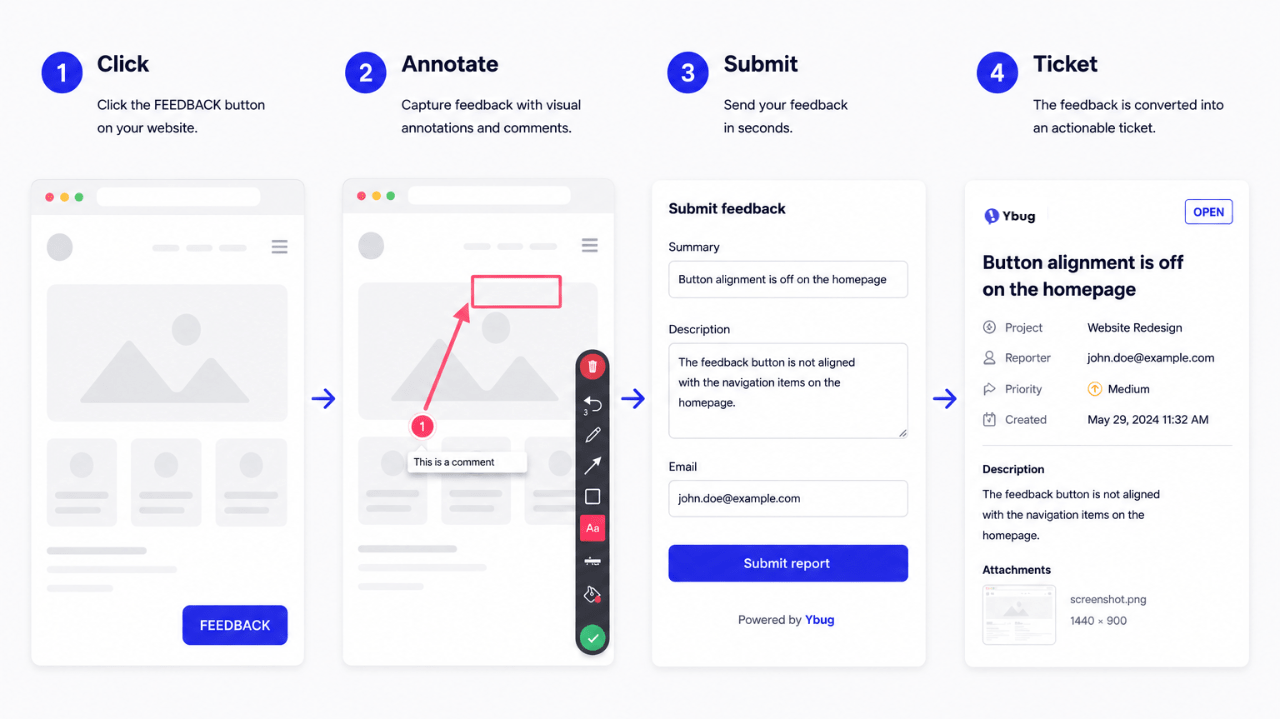
This is the method used by website feedback for developers, QA teams, and client-facing agencies. Here is how it works with Ybug:
Step 1: Add the widget to your website or staging environment. Paste a single JavaScript snippet before the closing </body> tag, use the WordPress plugin, or install via your CMS. Takes under 5 minutes.
Step 2: Share the URL with reviewers. Send the staging link to your client, QA tester, or project manager. No account creation needed - they just open the page.
Step 3: Click the feedback button. The reviewer clicks the Ybug button on the page. A screenshot is captured automatically.
Step 4: Annotate directly on the screenshot. Draw arrows, boxes, highlight areas, or blur sensitive information. The annotation tools are simple enough for non-technical users to use without guidance.
Step 5: Add a description and submit. The reviewer writes a short description of the issue and clicks submit. Ybug automatically captures the browser version, OS, screen resolution, page URL, and JavaScript console logs.
Step 6: The report arrives in your project management tool. The annotated report lands in Jira, Trello, Asana, GitHub, or your preferred tool - formatted as a ready-to-act ticket, not a raw email.
The entire process from “I see a problem” to “developer has a complete ticket” takes under 60 seconds for the reviewer.
The moment you put the annotation button on the page, the quality of feedback you get from clients and testers changes completely. They stop writing vague notes and start showing you exactly what they mean. That single shift saves hours per project.
Ybug takes under 5 minutes to set up - and the first annotated report changes how your whole team gives feedback.
(no credit card needed)
How to annotate images and screenshots
Beyond annotating live websites, teams frequently need to annotate images - design mockups, screenshots, exported assets, or reference images that do not live on a URL.
The most common tools for annotating images include:
Figma - designers annotate design files directly in the canvas, with comments tied to specific layers or frames. Best for design-phase feedback before a page goes live.
Annotate.co / Pastel - URL-based tools that let you annotate images or web pages by pasting a URL or uploading a file. Good for external reviewers who need no account.
Snagit / Awesome Screenshot - desktop or browser-based screenshot tools with annotation capabilities. Good for annotating pictures or exported images quickly before sharing.
Ybug video feedback - for issues that are hard to show in a static screenshot, such as hover states, animations, or scroll behavior, Ybug supports short video recordings alongside screenshots. The video captures the same automatic technical context as a screenshot submission.
When to annotate images vs. annotate on a live page: Use image annotation for design feedback during the design phase - when the page does not exist yet as a live URL. Use live-page annotation for feedback during development, staging review, QA, and UAT - when the real thing is available to review.
Trying to give feedback on a live site using annotated image exports is the pattern that leads to the most version confusion. If the page exists, annotate it directly.
Who benefits most from website annotation?
Website annotation is not just for developers. Every role in a web project has something to gain:
Developers stop wasting time on follow-up questions. A ticket with an annotated screenshot, browser data, and console logs is ready to reproduce and fix without further investigation.
QA testers log issues faster. With a feedback widget installed on the test environment, submitting a bug reporting ticket takes the same amount of time as noticing the issue. The feedback tool for testers captures everything technical in the background.
Project managers get a centralized view of all open issues, clearly tied to specific pages and elements - rather than scattered across emails, chat threads, and spreadsheet rows.
Clients do not need to learn new tools, understand browser versions, or write technical descriptions. They click a button on the page, draw on what bothers them, and write one sentence. That is it.
Agencies and freelancers can deliver staging sites with a professional review process already in place - a feedback tool for agencies that creates structure without adding overhead.
Website annotation best practices
Match the method to the reviewer. A developer running personal tests can use a browser extension. A client reviewing a staging site needs a frictionless widget they can use without an account. Use the right tool for the right audience.
Annotate on staging, not production. Annotation workflows belong on staging environments - where feedback is expected and acted upon. Running them on production creates confusion about what is a known issue vs. a live bug.
Be specific in your annotations. An annotation that draws a box around the wrong element and writes “this” is only marginally better than no annotation. Describe what is wrong, why it is a problem, and what you expect to see instead.
Keep one feedback channel. The biggest annotation workflow failure is having some people use the widget, others send emails, and others drop Slack screenshots. Funnel all feedback through one channel - it is easier to triage and nothing gets lost.
Teams using Ybug consistently report that the volume of actionable bug reports increases within the first week of installing the widget - simply because submitting feedback takes less effort than writing an email.
Review and close out. Annotations left open after an issue is resolved create noise. Close or resolve tickets as fixes are deployed. For ongoing projects, a regular triage cadence, weekly is fine for most teams, keeps the backlog clean.
Do not annotate documents you can edit directly. If you are reviewing a Google Doc, a Figma file, or a CMS draft that is not yet published, use the tool’s native commenting features. Annotation tools shine on live URLs and published pages - not on editable source files.
For teams also running user acceptance testing, combining a structured UAT test plan with a live annotation tool gives testers both the process guidance they need and the fastest possible way to log what they find.
How do you choose the right website annotation tool?
The right tool depends on three things: who is annotating, where the feedback needs to go, and how much setup you are willing to do.
For internal teams reviewing live web apps: A dedicated visual feedback widget with PM integrations such as Jira, GitHub, and Asana is the most efficient setup. Reports arrive in the right place without manual formatting.
For client-facing agency work: Guest access, no login required, frictionless UI, and automatic technical context capture are non-negotiable. Clients will not install anything or create accounts.
For quick ad-hoc markup: A browser extension or screenshot tool is fine for personal reference or single-use annotations you will not need to track over time.
For video and interactive states: Choose a tool that supports screen recording alongside screenshots - hover states, animations, and scroll-triggered behavior cannot always be captured in a static frame.
You can start free with Ybug in under 5 minutes.
(no credit card needed)
